Nicholas Arellano
Ryan Matsuo
Madiba Sutton
Intro .:. Set Up .:. Results .:. Conclusion .:. Sources.:. Related Websites.:.Go Up
IB Physics II Project Final Paper: Coil Accelerator
The items used in the experimental setup was the coil to launch the projectile, a ruler to measure the distance that the projectile underwent, and a video camera to collect and record the data. For the videos a note card with the voltage and velocity written on it is shown for the viewers of the experiment. For the experimental setup, the coil was placed on a table next to the number one centimeter side of the ruler with the projectile lined up next to the one centimeter line mark. The reason the video camera only films from inch twelve to a little past inch nine is because the projectile never goes farther than around sixty millimeters (about two and a third inches/six centimeters).
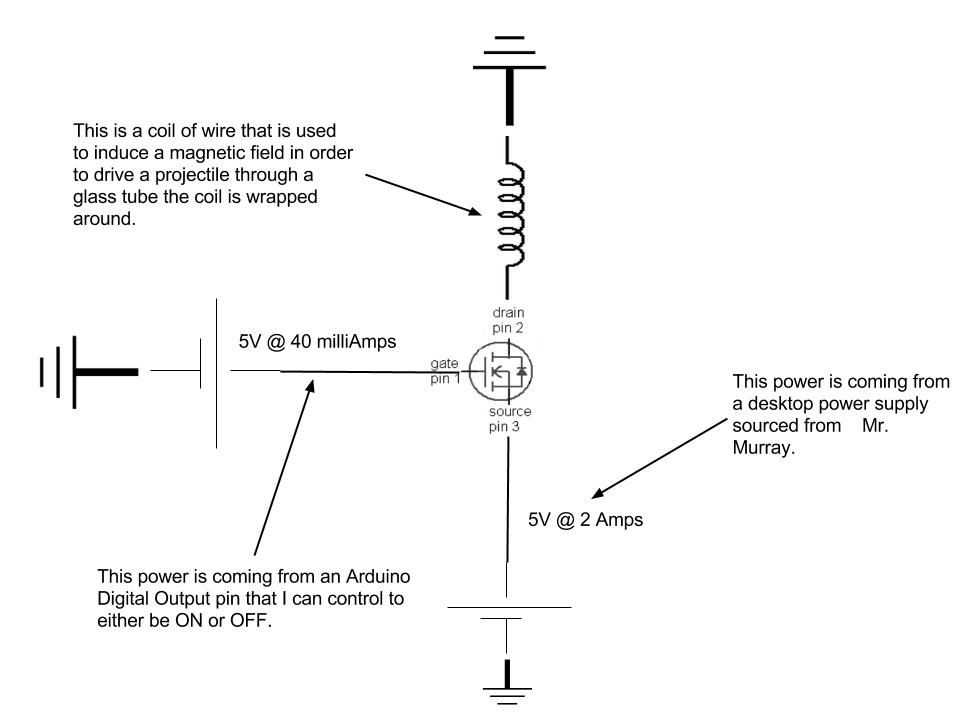
To control the current flowing into the coil an Arduino board was used. Arduino is a single-board microcontroller, intended to make the application of interactive objects or environments more accessible. The hardware consists of an open-source hardware board designed around an 8-bit Atmel AVR microcontroller. Pre-programmed into the on-board microcontroller chip is a bootloader that allows uploading programs into the microcontroller memory without needing a chip device programmer. The metal–oxide–semiconductor field-effect transistor (MOSFET) was the transistor used for amplifying or switching the electronic signals. The MOSFET is by far the most common transistor in both digital and analog circuits, though the bipolar junction transistor was at one time much more common, therefore it can be regarded as a popular and efficient tool. A video was then taken for each voltage step and the results it created. After that, the frames from the videos were counted in order calculate how far the projectile went, for how long, and it’s average velocity.
Results: The results section has graphs of data and discussion of the experimental uncertainty. It rarely contains all the raw data.
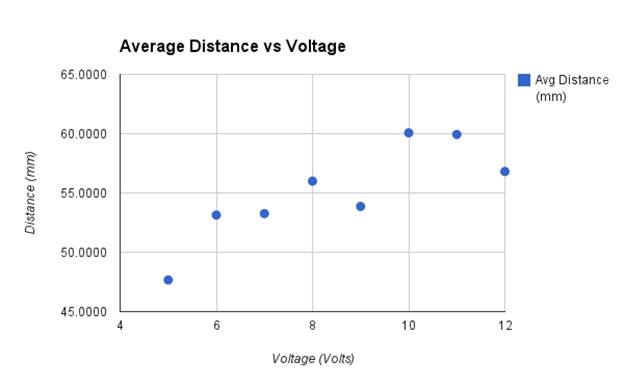
Our hypothesis stated that with in increase in the accelerator of Voltage and Current, the projectile would increase in distance traveled, increase in velocity, and decrease in the amount of time the coil is on. For the most part, this was the true. With increments of one volt increase, the average displacement increased by 1.3065mm. This is not a significant rate of change but based on that the increase is only by one volt, its appropriate. At each different voltage, the
projectile traveled a different distance:
Average Distance per Voltage
|
Voltage |
Displacement |
Uncertainty |
|
5V |
47.6667 |
1.2222 |
|
6V |
53.1429 |
1.1429 |
|
7V |
53.2667 |
0.2667 |
|
8V |
56.0000 |
0.7500 |
|
9V |
53.8667 |
0.8667 |
|
10V |
60.0714 |
1.1429 |
|
11V |
59.9333 |
0.8000 |
|
12V |
56.8125 |
0.8125 |
The distances at each increase of voltage does not always increase, but the average change is +1.3065mm which is a positive increase. For the most part, the hypothesis is correct.
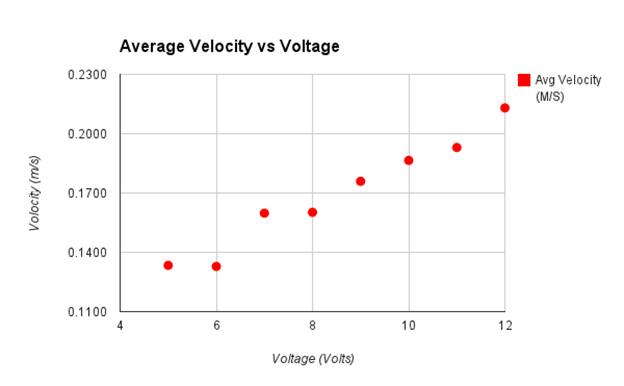
There was strong belief within our group that as voltage and the current increased in our accelerator, the projectile within the accelerator would understandably experience a greater velocity leaving the barrel. Our belief in the hypothesis was tested and confirmed as our trials came to a close. The initial question or hypothesis that was proposed was met with success in the regard that the data seemed to fit; however, outliers slipped through the cracks, requiring our group to dig deeper.
Modern Linear Synchronous Motors (LSM) works in the same realm as our simple coil accelerator. In order to regulate or control the speed and acceleration of a projectile, voltage is increased or decreased. The base voltage we used in our experiment was a measly 5V; gradually increasing by 1V for each set of eight trials. The overall trend of our data suggests that as the voltage increases, the projectile’s velocity also increases, confirming our hypothesis.
Not one experiment can escape the clutches of error. Some problems were prevalent in our project. The means to gather data were a little “pre-renaissance”. In order gather to the distance traveled by the projectile, a ruler would be placed parallel to the translucent barrel and when the projectile was fired a member of our group would record the data. This method was plagued with errors. Thankfully, uncertainty is a large part of any science. If at any point we were required to recreate our project, we would first account for the error created. A more accurate measuring system is vital. Another modification to our project would be the addition of more coils. Adding more coils allows us to safely increase the voltage of our accelerator, thus giving us more testing room. In the end, the final product of our project was a success. The coil accelerator was built, data was collected and processed, and our results were clearly laid out. Creating a better working coil accelerator would be in our best interest, suggesting the proper conditions were met.
Linear Induction Motor, Wikipedia.org, < http://en.wikipedia.org/wiki/Linear_induction_motor >
This
website explain what a LIM was compared to a LSM
Linear
Synchronous Motor, Wikipedia.org, <
http://en.wikipedia.org/wiki/Linear_motor#Synchronous_motor >
The cousin of the previous site. This
page explained the application of LMS motors
Simple
Two-Pole DC Motor, Wikipedia.org, <
http://en.wikipedia.org/wiki/Permanent-magnet_electric_motor#Simple_two-pole_DC_motor
>
STPDC
motors were how we got our coil gun to work. This was also important to include
in our reading
Physics of
Roller Coasters, Magnetic Roller Coasters, <
http://jessicagarratt.wordpress.com/2012/03/15/physics-of-roller-coasters/ >
Learning how roller coasters
worked was vital to our project; this site illustrated the basic in's and out's
How Maglev
Trains Work, Howstuffworks.com, <
http://science.howstuffworks.com/transport/engines-equipment/maglev-train.htm >
Maglev
trains, similar to roller coasters, were important to our process