An Exploration in the Relation Between Pressure and Initial Velocity at a Constant Volume, in Regards to a Compressed Air Gun Made Entirely from Products Purchased at Home Depot
Brian Grambow
Justin Recore
Amelia Sires
Period 3A
Statement of Problem
The purpose of this experiment is to find the relationship between the pressures
of the tank to the distance the projectile is shot out of the cannon.
Table of Contents
Hypothesis Review
of Literature Materials Procedure
Cannon Construction Procedure Results
Error Research Log Bibliography Return
to Research Page
Hypothesis TOC
If we launch a tennis ball out of an air cannon, then the initial velocity of the tennis ball will increase as we increase the air pressure inside the reservoir.
Background Information
People commonly use air cannons for sport. Air cannons launch a variety of projectiles: potatoes, rockets, or anything that can fit inside the barrel. Engineers use air cannons in the design of paintball guns, and air soft guns. Both require the use of CO2 canisters to provide the air to shoot the paintball or the pelets. Air guns have existed since the 15th century. Unlike primitive firearms, air cannons were quieter, processed no muzzle flash, and unaffected by wet weather. The problems with air guns for soldier use were, chambers would explode, they would slowly leak pressure and they were not powerful. One of the first air guns designed was an Austrian gun, built in 1780 by Bartholomew Girandoni. It carried twenty .52-inch calibers in a tubular magazine, and one shot from this gun could penetrate a one-inch wooden board at a 100 paces. The effect is roughly equal to that of a 9mm or .45 caliber pistol (Wikipedia). In the 1890’s, air rifles were used in Birmingham, England as a competitive target sport. Founded in England, the National Rifle Association founded 4000 air rifle clubs. Throughout time, the main used of air guns was for sport whether it is shooting people in a game of paintball or shooting potatoes at cars.
Review of Literature TOC
There are many variables concerning the operation and construction of air cannon. These factors include barrel and reservoir volume, the air pressure in the reservoir, and the ambient temperature. We will not be able to control the ambient temperature, but we will measure it. The main issue presented by the air cannon is whether to manipulate the air pressure or the volume of the cylinder. However, due to the constraints of glue, pressure is much easier to manipulate than building different reservoir cylinders (Bavetta). We also discovered how to build the correct barrel length, which is roughly the same volume of the air reservoir however; it does not need be of the same dimensions (Millis). Spudtech.com suggests higher barrel ratios of 4:1 or 5:1 reservoir volume to barrel length, but they also said a 1.5:1 could achieve solid results. Common sense dictates that we do not exceed pressures of over 100 psi, or depending on amount of pressure, the pipe can handle.
Materials TOC
1. 3 in diameter ABS pipe, measuring 8 ft and 3 ft as two separate pieces
2. ABS Glue
3. 24 V solenoid Sprinkler Valve
4. Teflon tape
5. Tape measure
6. Air Compressor
7. Chalk
8. Tennis Ball
9. timer
10. ¾ coupling air fittings for compressor
11. ¼ ball valve
12. 1 threaded bushing to go from 3 in to ¼ in
13. 1 toggle switch
14. 1 push button switch
15. 3 9 V batteries
16. 2 ¾ elbows
17. 1 ¾ male to male coupling
18. Masking Tape
Procedure- When Cannon is built for Data Collection TOC
1. Connect the valve on the air cannon’s tank to the air compressor, and fill the tank until the air compressor reads 10 psi.
2. Close the valve so that the air will stay inside the tank, and then disconnect the air valve from the tank to prepare for launch.
3. Make a line on the street with chalk so this can be used as a consistent spot to shoot the air cannon for multiple trials. Dust the projectile with chalk in order that the landing spot is visible.
4. Shove the tennis ball into the reservoir, and walk to the line where the cannon will be fired.
5. Have another person be the timer, as well as be the one to judge where the ball landed on the street so it can be marked.
6. Hold the cannon at a 45-degree angle release the safety switch and press the firing mechanism. The timer must time from when the ball is launched, until the time it lands.
7. Mark the spot where the tennis ball landed so that distance can be recorded.
8. Repeat steps 1-7 seven times for a pressure of 10 psi.
9. When the trials for 10 psi are finished, repeat steps 1-8 for pressures of 20, 30, 40, 50, 60, 70, 80, 90, 100 psi.
Cannon Construction Procedure TOC
1. Gather necessary materials
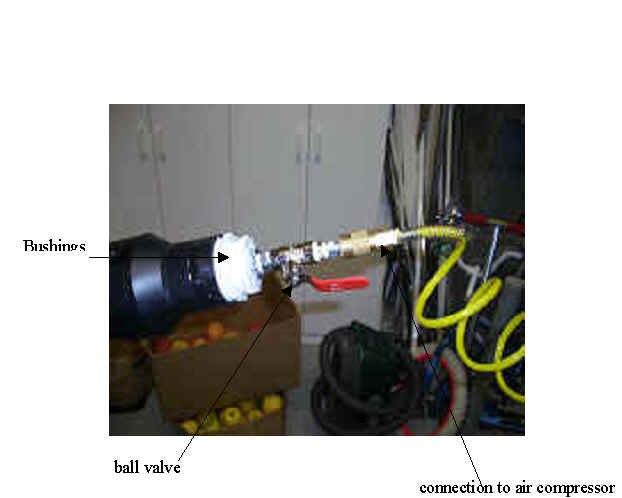
2. To construct tank, glue one bushing to one end of the six feet of ABS pipe. Connect a ¼ ball valve to that end (figure 1). WRAP EVERY CONNECTION WITH TEFLON TAPE. This keeps air from leaking out of the cannon. On the other end connect other busing, and connect the elbows to this bushing (figure 2).
3. On the other end of the ABS pipe, connect other busing and connect the elbows and coupling to this bushing (figure 2).
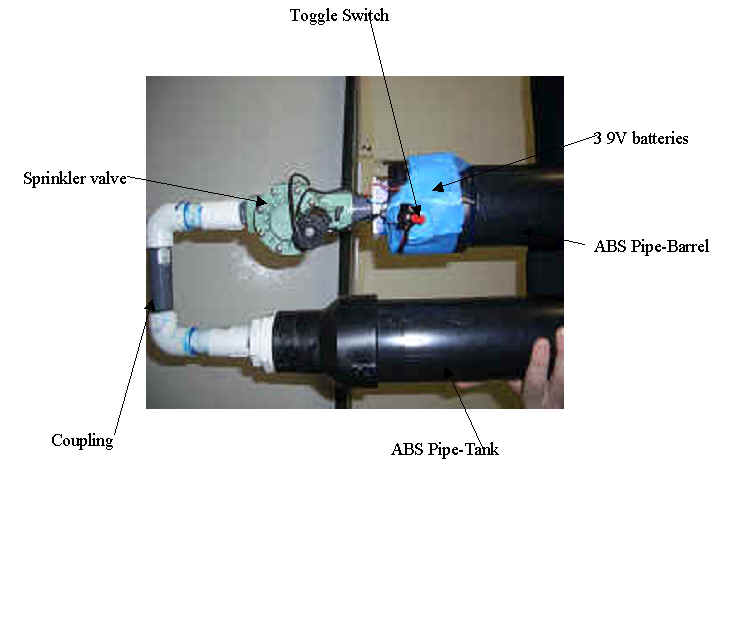
3. With the three feet of additional ABS piping, connect a 3" to ¾ in bushing to one end of the pipe. After this is connected, connect the sprinkler valve to this end and to the remaining elbow. The construction of the pipe is now complete, but the firing mechanism remains.
4. For the firing mechanism, wire together the 3-9V batteries, the toggle switch and the push button switch. After this is complete, wire the unit to the sprinkler valve and the cannon is ready to fire.
Building the Cannon
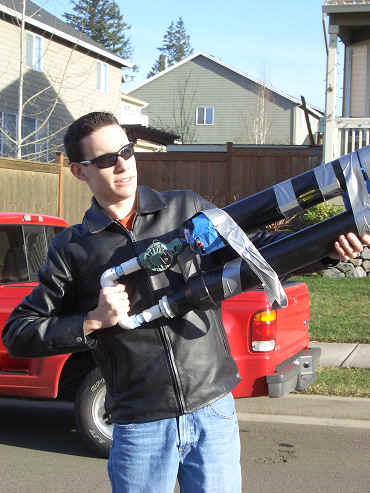
Our first attempt at the air cannon failed. We decided to bypass connecting a reservior by attaching the air compresssor to the cannon barrel. This design failed. It failed because we did not have an available volume of air to launch the projectile. To solve this we attached a reservoir to the barrel. This second version of the cannon worked, but we used PVC glue on ABS plastic. The pieces did not attach. During a fill, this end blew off, nearly killing Justin. The final design worked because we used the correct glue, and we had a reservoir. Also, with the first design, the couplings to the compressor were ¼” which restricted the air flow to the ball. We fixed this by using ¾” couplings between the reservoir and the barrel.
Results TOC

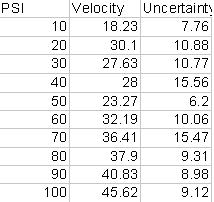
Our Data represents our hypothesis. However, the uncertainties are quite high. The geneneral from of the graph represents an upwards curve that eventaully tapers off as the pressure reaches 90 psi. The dip in the graph by the 50 psi, although it doesn’t fit the curve, is inside the range because of the uncertainty. This dip might also be caused because we changed shooters, the difference in interperation of the launch ange between Brian and Amelia could cause this diviation from the expected curve. This same reasoning can be applied to the spike at the 20 psi mark. But again, due to the uncertainty this fits inside the hypothesis.
To find the uncertianty we used the ∆y/y=∆a/a+∆b/b uncertainty equation from the physics data packet. A is the average time for the data set and ∆a is the range of that data divided by 2. B is average displacement, ∆b is the range of the displacement divided by 2. Y is the average intial velocity, ∆y is uncertainty.
For the velocity we took the SUVAT equation, s=u+v/2*t and used algebra to find v=(2s)/t. V is initial velocity, s is displacement, and t is time. We skiped u, final velocity, because it is 0, with no effect on the initial velocity with the equation.
Sources of Error and Improvements TOC
There were a number of possible sources of error with this experimental setup. First, we were not able to control neither the ambient temperature nor the temperature of the air inside the reservoir. Temperature affects the pressure of a gas, and our experiment relied on a consistent pressure. According to the Combined Gas Law, a change in pressure causes a change in volume. Inconsistent volumes would affect the initial velocity of the tennis ball in the projectile. Also, Brian and Amelia fired the cannon. How each interperated the angle on the level we put on the cannon would affect the distance, as well as, the difference in height between the two shooters.
Secondly, the human reaction time with firing the cannon and controlling the stopwatch also contributes to a large uncertainty. I would recommend the use of a radar gun to find the initial velocity.
Thirdly, the cannon leaked at pressures higher than 30 psi. We tried to fix this problem by using Teflon tape on the threads of the bushings. This stopgap solution did not stop all the leaks.
I would also like to experiment with different reservoirs volume to barrel volume ratios. We used a 3:1 ratio, perhaps a 4:1 or 5:1 ratio would yield different results. The increased volume would apply more force upon the projectile. The increased force would maybe yield more conclusive results at the higher velocities.
Research Log TOC
9/17; 1 hour. We got together and decided that we wanted to build an air cannon using compressed air instead of using a combustible gas. Justin will look for designs on the internet.
10/21; 3 hours. We researched as a group at Grambow’s house for a design. There are three main things we need to consider in our design. First, we need to decide what we are going to launch. Perhaps a golf ball, tennis ball, or racquetball. Secondly, we need to decide a barrel volume to reservoir volume. Some guys use a 3:1, but anything larger than a 5:1 reservoir to barrel volume ratio will perform about the same. Lastly, are we going to change the volume and keep the pressure the same, are we going to adjust only the pressure, or are we going to use a mixture of volumes and pressures?
10/25; 3 hours. Justin and Brian did some formal research. We checked wikipedia, and few other sites to review on Charles’ Law, and Boyle’s Law, and the Combined and Ideal gas laws. Unfortunately, we cannot launch the projectiles indoors, so our results will be imprecise. However, we did decide on our design, we are going to connect the air compressor to a solenoid sprinkler valve. Most of the successful designs we found use a solenoid valve; we decided to follow the trend.
10/28; 3.5 hours. We trekked to Home Depot bringing a racquetball and tennis ball to find an ideal barrel material. Unfortunately, there is too much friction between the rubber racquetball and ABS plastic (they do not sell PVC in diameters larger than 1inch at Home Depot). The tennis ball has a diameter of 2.6 inches, and ABS plastic is manufactured in 2.5 inches and 3 inches, so we will need to develop some sort of wadding. I think we will try a rag wrapped around paper like a Minnie ball in a muzzle-loading rifle. Later we built the cannon using a two-foot piece of 3 inch ABS connected straight to the air compressor through the solenoid valve. This design did not work very well, barely launching at rolled-up rag out of the barrel. We think we need to attach a reservoir underneath the barrel to allow for a volume of air to hit the ball verses just a small amount coming from the compressor hose.
11/1; 2.5 hours. Again, we trekked to Home Depot to buy fittings to attach the reservoir to the barrel. We started assembling the fittings and realized that we did not have nearly the right amount of volume to project an object as massive as a tennis ball. Instead of the ¼” diameter pipe, we need something around ¾” or 1”. Paintball guns use either high volume, low pressure, or low volume, high pressure to launch a paintball about 300 feet per second. Brian’s paint gun needs about 500 psi to launch a paintball, whereas his brother’s needs 800 psi. Since we are using a relatively low pressure, we need higher volume.
11/8; 1 hour. We attached the pieces together, but had an end piece fly off the reservoir at a pressure of 50psi. Apparently, PVC glue does not adhere to ABS plastic.
11/11; 2 hours. After the ABS glue cured and a few hours of Halo 2, we assembled the gun. It worked. It was dark, but we launched it about 30 meters, with 50 psi, at a forty-five degree angle.
11/17; 1 hour. After our presentation, Murray suggested that our hypothesis explore the relationship between pressure and the initial velocity out of the air cannon.
12/13; 1 hour. Testing Day 1. We established a procedure on testing the hypothesis. According to the s=u+v/2*t equation, we need to collect data for the time the ball is in the air, as well as, the distance it traveled. The timer calls out three…2…1…fire! In addition, finds the chalk mark (we dusted the tennis ball and wadding in crushed chalk) and marks with number in the current data set (10 psi, 20psi, ECT.). We finished the 10-psi and 20psi
12/19; 2 hours. Testing Day 2. Finished 30, 40, and 50 PSI. The ambient temperature might skew our results according to the Combined Gas Laws. Unfortunately, we could not find a solution to this problem. If only mom would let us shoot it inside…
12/20; 2 hours. Testing Day 3. Finished 60; 70 PSI. Christmas Lights and Electric powered air compressors cannot get along.
12/21; 2 hours. Testing Day 4. Finished 80, 90, and 100 psi. With these last three data sets, we noticed that we were getting large amounts of concurrence inside the ranges. Perhaps the pressure/velocity relationship is an exponential curve that eventually has an undefined slope.
Raw Data
Bibliography TOC
Bavetta. Air Cannon Design <bavetta.com>, 2002
Millis, Bill. “Not How To Build an Air Cannon”, Corin.com
< http://corin.com/bill/paintball/aircannon >. 1999
Surpise, Joel. “Theory”. The Spudgun Technology Center
<<http;//www.spudtech.com/content>> 2004
"Air gun." Wikipedia, The Free Encyclopedia. 18 Oct 2006, 13:00 UTC. Wikimedia Foundation, Inc. 26 Oct 2006
"Spud gun." Wikipedia, The Free Encyclopedia. 25 Oct 2006, 17:40 UTC. Wikimedia Foundation, Inc. 26 Oct 2006 <http://en.wikipedia.org/w/index.php?title=Spud_gun&oldid=83673924>.
This page has a massive nerd explaining how he built his verision of an air cannon. Excellent discussion of safety issues.
This page is dedicatecd to a dorm that created a small air cannon to hit a neighboring dorm easily. Very silly, but has a nice mathematical analysis calculator
This page is the home page of the 2nd Amendment pumpkin chucking team. This place is crazy
How Not to Build an Air Cannon
An avid paitnballer, Bill Mills discusses the merits of compressed air cannon in reagards to lanching potatoes. Very informative.
Pneumatic Tennis Ball Launcher, Potato Gun, Spud Cannon, etc.
John W. Cornwell design is very similar to our design, but he has worked out some the kinks. Also, he has pictures of the damage done to a tenis racket from this design.