Introduction | Method | Data | Conclusion | Bibliography | Research Page
| We built a pneumatic cannon, based on research from our sources. We used PVC pipe, making up both our barrel and our compression chamber. The chamber was connected to the barrel via a ball valve, which stood as our trigger. The valve worked to release the pressurized air from the pressure chamber into the barrel, ultimately launching the projectile, which was a b golf ball. A 3" to 2" reducer was used to connect the chamber to the ball valve. Our projectile was launched using 60 psi. Using, PVC cement, we were able to connect all of these parts to make one functional (and beautiful) air cannon. We used an air compressor to fill the chamber. The air compressor itself had a pressure gauge, allowing us to maintain a constant pressure in all of our trials. The ball valve we used to fill the chamber connected to the air compressor. An end cap was also cemented on to one end of the 3" PVC pipe so that the air would not escape the pressure chamber. Our materials are listed below: |
|
4' of 2" diameter PVC pipe 2" diameter ball valve 3"-2" reducer 1.5' of 3"diameter PVC pipe 3" diameter end cap PVC cement Ball valve with an air compressor connection 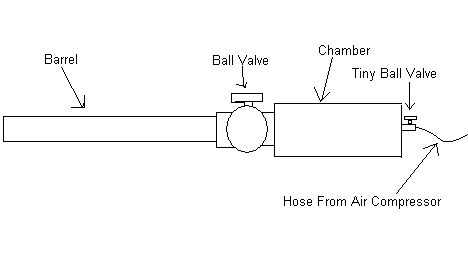 |
| The next part to our experiment was deciding what we could use to prop the cannon up. Because the cannon was quite long, it had to be something tall, at least when we got to high angles like sixty and seventy-five degrees. For angles below forty-five degrees we decided to use a recycling bin. To get our desired angle we used trigonometry. For example, at fifteen degrees we measured the height of the recycling bin and then plugged that number in as the opposite side from our fifteen degree angle (the cannon to the ground) to find the horizontal distance the cannon had to be from the recycling bin (we used the side opposite the angle divided by the tangent of the angle). We marked the spot on the ground where the back of the cannon needed to rest to get our desired angle. For angles above forty-five degrees we used a garbage can (which had more height) so that the cannon balanced easier. To begin our experiment we needed a golf ball, a long tape measurer, string, and an air compressor. We marked distances on the string with the tape measurer because the tape measurer was not long enough to measure the distances efficiently. The procedure to firing the cannon is as follows: |
| First connect the air compressor to the pressure chamber via the small ball valve and make sure the valve is open. Fill the pressure chamber with compressed air to 60 psi (there is a gauge on the air compressor that tells you the psi). Then close the valve on the small ball valve, turn off the air compressor and leak out the extra pressure in the air compressor. Load a golf ball into the barrel. Place the back of the cannon the correct distance from the recycling bin/garbage can to get the correct angle. Turn the large ball valve as quickly as you can to release all the air at once and fire the golf ball. Find the ball and measure the distance it traveled. |