The purpose of this lab was to prove the hypothesis that, as air bubbles rise to the top of a cylinder filled with water and disperse, the speed of sound traveling through the air/water mixture will increase. In conducting the experiment the student went through several changes in the lab setup in order to arrive at a situation in which the data collected would be conducive of reliable results. After much analysis of the data from several different experimental setups the student concluded that the hypothesis was supported by the information found.
The study of sound dates back thousands of years. Physicists first started comparing sound to the movement of water (Pierce). When water was disturbed they noticed that it emitted ripples from the source of disturbance. They perceived that like water's ripples, sound would rebound from objects it hit (i.e. a wall) and come back to its source (Pierce). It was decided that sound was wavelike, vibrating particles outward from its source, and this vibration is what our eardrums perceive. They also discovered that sound had characteristics such as frequency, wavelength and amplitude. Each of these qualities relates to what we hear, a high frequency and smaller wavelength creates a higher pitched sound while the amplitude of the wave affects how loud the noise appears. They found out how sound moved and how it was perceived, but they still had to discover how quickly it moved from one place to another. At first they could apply the simple formula v=s/t where v=velocity, s=distance, t=time. Literally they were measuring the time, t, it took for sound to move a distance, s, but they soon realized this would be hard to do because sound moved at an incredibly fast pace, roughly 332m/s in air at sea level. They also realized that sound moved at different speeds through different mediums such as water, metals, and other gases. They needed another way of explaining how quickly sound moved and what affected it. They found it in v=sqrt (B/p) where v=velocity of sound, B=bulk modulus, and p=the density of the medium. Bulk modulus is pressure/strain, where strain=(V0-V1)/V0. V0 is the initial volume and V1 is the reduced volume caused by the pressure. P or other wise known as density, is mass/volume. This offered a more preferable explanation. Mediums that had more pressure and smaller densities allowed sound to move quicker. Higher pressure creates more molecules in the same area giving the sound wave more objects to move and rebound off, thus letting it travel faster. This would explain why sound travels slower in air than in water, and even faster in deeper water where the pressure is greater but the density remains the same. Due to this same factor sound moves even faster through materials such as steel. It explains why sound moves faster on humid days. This is because there is more water in the air and sound travels faster in water due to its higher density (Speed O' Sound). Another way of procuring the speed of sound is through an analysis of its wavelength and frequency. By using the formula (v = lambda * f ) where v = velocity, lambda = the wavelength and f = frequency and multiplying f and lambda together, one can arrive at the speed of sound for a particular instance.
The speed of sound has often been measured in constant mediums: air, air with high humidity, water, steel, etc to prove that getting the speed of sound through the bulk modulus method was correct. But how is the speed of sound affected when the state of the medium changes? An example would be steel that is slowly melted down, or water that is cold then heated. Is there a linear relationship between medium's change and the speed of sound?
What I propose to do is test water containing air bubbles that slowly go away as they float to the top of a cylinder. I will look for what affect the bubbles dissipating has on the frequency, and speed of a sound emitted when an object repeatedly hits the container holding both the water and bubbles. I believe that due to a change in the bulk modulus and density of the water as the air bubbles dissolve that the speed of sound and frequency will both increase as the amount of bubbles decreases.
| Cylinder | Laser | Calculator | Water |
| Microphone | Light Bulb | Microsoft Excel | Computer |
| Tape Recorder | Black Paper | MPLIX (computer software) | Stand |
| Light Sensor | Clamps | Physics Books | Ruler |
My
initial experimental setup was a simple concept. Fill a cylinder with
bubbly water and then measure the light passing through it as well as
the sound emitted as I tapped on the tube with a ruler. If everything
went right the light being picked up would increase as the film created
by the bubbles dissipated and the sound would also change pitch as I tapped
it. Both those things occurred, but my tools for reading the data, unfortunately,
did not pick up any of those changes. In my first attempt I had the Laser
up on a stack of books pointing at the Light Sensor. In between the two
I placed the cylinder. At the foot of the cylinder I also placed a microphone
(see Figure 1)
 .
.
When I began recording data, the information being sent to the computer by the Light Sensor and Microphone created stagnant data. It flat lined on the graph when there should have been noticeable changes. First I dealt with the inability to read the light change, so I replaced the laser with a light bulb completely enclosed in a black box, with a circle to let the light out. This created a more direct steam of light. When I tried the experiment again, the light data began to record and the change was shown, although not quite as drastic as I would have expected. Next I dealt with the microphone. I found that to get any precise readings with it one would have to set the pace at which it took readings to an extremely high rate. This cut down on the time I could take data, (the computer could only process so much information) from the 2 minutes it took for the bubbles to dissolve to a minor 0.2 seconds. I couldn't show the change in pitch with just 0.2 seconds worth of data. That's when I got the idea of using a tape recorder to record the entire 2 minutes of sound, and then play it back at small intervals of 0.2 seconds. I could now record data, but like in many projects, new perspectives are brought to light. Thanks to some suggestions by Mr. Murray, I found I wasn't getting the optimal reading on the light. This was because I was taking light readings at a horizontal angle, when the bubbles dissolve at a vertical angle (see Figure 2).

This meant my data would read that there were no bubbles in the water, when in fact; the cylinder was still half full with them. Now I had to rearrange my setup again. Now I put the light bulb underneath the cylinder. For stability on the part of the cylinder, and to allow the light sensor to reach over the top of the cylinder I had to stack up old physics books as a platform. With a few clamps clipped to each other I was able to center the light sensor over the cylinder (see Figure 3).

At a final word of advice I added the last touch to my experiment, a tube of black paper. This went around the cylinder. It blocked out any light that was not from the bulb from reaching the sensor. The added light from the ceiling lamps could cause slight problems with my findings. This was my final setup. There was only one flaw in it that I could find, and it had to do with the sound. The move from the cylinder sitting on the counter to the stack of books made a rather large difference. The books absorbed far greater amounts of energy when I struck the cylinder then the counter had. This caused a dampening of the sound that made the change in pitch much harder to distinguish.
 .
.
When I began recording data, the information being sent to the computer by the Light Sensor and Microphone created stagnant data. It flat lined on the graph when there should have been noticeable changes. First I dealt with the inability to read the light change, so I replaced the laser with a light bulb completely enclosed in a black box, with a circle to let the light out. This created a more direct steam of light. When I tried the experiment again, the light data began to record and the change was shown, although not quite as drastic as I would have expected. Next I dealt with the microphone. I found that to get any precise readings with it one would have to set the pace at which it took readings to an extremely high rate. This cut down on the time I could take data, (the computer could only process so much information) from the 2 minutes it took for the bubbles to dissolve to a minor 0.2 seconds. I couldn't show the change in pitch with just 0.2 seconds worth of data. That's when I got the idea of using a tape recorder to record the entire 2 minutes of sound, and then play it back at small intervals of 0.2 seconds. I could now record data, but like in many projects, new perspectives are brought to light. Thanks to some suggestions by Mr. Murray, I found I wasn't getting the optimal reading on the light. This was because I was taking light readings at a horizontal angle, when the bubbles dissolve at a vertical angle (see Figure 2).

This meant my data would read that there were no bubbles in the water, when in fact; the cylinder was still half full with them. Now I had to rearrange my setup again. Now I put the light bulb underneath the cylinder. For stability on the part of the cylinder, and to allow the light sensor to reach over the top of the cylinder I had to stack up old physics books as a platform. With a few clamps clipped to each other I was able to center the light sensor over the cylinder (see Figure 3).

At a final word of advice I added the last touch to my experiment, a tube of black paper. This went around the cylinder. It blocked out any light that was not from the bulb from reaching the sensor. The added light from the ceiling lamps could cause slight problems with my findings. This was my final setup. There was only one flaw in it that I could find, and it had to do with the sound. The move from the cylinder sitting on the counter to the stack of books made a rather large difference. The books absorbed far greater amounts of energy when I struck the cylinder then the counter had. This caused a dampening of the sound that made the change in pitch much harder to distinguish.
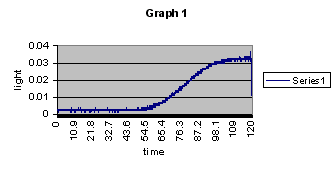
After I got the experiment up and running and collected my data, the next step was to analyze it. My process wasn't necessarily difficult, but it would prove to be extremely time consuming. When the data was read and inputted by the light sensor the Light vs. Time graph came out perfectly. It showed light at a lower reading when the water was clouded with bubbles and showed a smooth transition to the point when the water was clear again (see Graph 1).
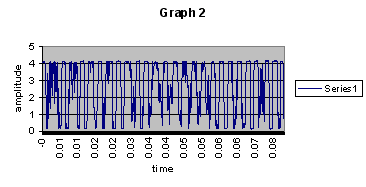
The sound data analysis would prove less straightforward. First of all I couldn't input at 0.2 seconds at a time for 2 minutes worth of data (remember I had recorded it on a tape). So what I did was choose 25 points from the 2 minutes to analyze. They were all, for the most part, equally spaced out points from the 2-minute period. When inputted and graphed individually they came out looking something like (see Graph 2).
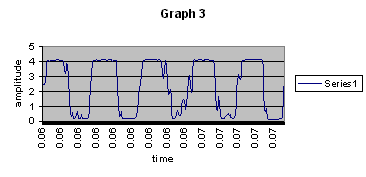
Even in the 0.2-second time intervals, there were too many periods for me to analyze. So I zoomed in on a more specific part of each interval. I looked specifically for sections that had periods which appeared roughly uniform. They also had to last .01 to .03 seconds of time. These graphs were much easier to analyze, they actually looked somewhat like a periodic function (see Graph 3).
Now that the data for the sound was in a form that was actually recognizable I could go to work on finding the frequency. To do this I used its definition as found in Giancoli: " Frequency, f, is the number of crests - or complete cycles - that pass a given point per unit time" (Giancoli). Basically what I had to do for each graph was: find several uniform periods, and the point in time when the first began the final one stopped. So, as an example, I found 4 periods in the range of time from .01488s to -.00287s. To find the frequency I just divide 4 by the difference in time. This gives me 333 Hz. After doing this for each of the 25 points I graphed them to see how they changed over time (see Graph 4).

The final step in data collection was to find the speed of sound. To do this I used my previous frequencies and multiplied them by the wavelength using the following formula ( v = lambda * f ). To find the wavelength I used some known information. First was that with a close ended and open ended cylinder my constant would be 0.25. This lead to the formula for wavelength (lambda = L / 0.25) where lambda is wavelength and L is length. The length was just the distance in meters from the bottom of the cylinder to the top where the water stopped. This was 0.334 meters. Plugging in each of the values I found that the wavelength was 1.336. The next step was to just multiply each of the frequencies by 1.336 and graph them. This graph basically turned out identical to that of the frequency (see Graph 4) just that each of the y values was now 1.336 times larger, giving me a range in the speed of sound from 309 m/s to 3314 m/s. While those were the extremes most values ranged between 468 m/s and 635 m/s.
A lot of science is hit and miss, especially in the classroom, where equipment isn't exactly at it's finest. Due in part to this my sound data was an utter disaster. For the most part the frequency stayed relatively uniform at 350 to 450 Hz, with random frequencies shooting up into 1500 Hz and even 2400 Hz range (see Graph 4). I tried looking at the data without the abnormal points; there was a slight upward trend in the frequency, but nothing like I would have expected.
The speed of sound was worse than the frequency. Although the speed of sound was based off of the frequency and the graph had the same slight upward trend and several random points the problem lay in the fact that some of the points couldn't possibly exist. The readings of the speed of sound traveling 3314 m/s and 2103 m/s are impossible. This is because the maximum speed of sound in water is approximately 1440 m/s (this is at 20 degrees C and 1atm) and in air it is 332 m/s. Luckily, although lacking any drastic change, the other points would work. They all landed safely within the 332 - 1440 m/s range.
Why did my data not match up with my hypothesis? Well, while not conducting the experiment, but practicing tapping the cylinder, I had gotten the pitch to change every time, but whenever I conducted it in the experiment the sound came out all wrong. I attested this to several factors. First was the change in material it was set on when tapped. I believe the books damped some of the harmonic vibrations of the cylinder a great deal more then the hard counter. Secondly, with my last experimental setup I was unable to tap the cylinder from the bottom, which made a much more resonating sound as opposed to tapping on the side of the cylinder. This was due to the fact that the light bulb and the way it was positioned didn't allow the space for that kind of movement. Thirdly, was the fact that there were other people in the room and their voices may have been picked up in the data collection, thus distorting my results. Finally, was the fact that I had to use a tape recorder. The sound was not from a primary source. The recorder could have possibly distorted the sound and made its quality less pure when played back for data collection. After taking each of these factors into account I decided to rerun my experiment. I was able to fix three out of the four problems.
I was able to change everything except the use of the tape recorder. The microphone just couldn't pick up the sound on its own, for some reason it had to be played back through the tape recorder. I also still had the problem of only being able to play back 0.2 seconds of data at a time. (My bubbles wouldn't politely stop floating to the top in order to give me time to recorder the data, save it, then create a new document for the next set of 0.2 seconds of data). So the tape recorder stayed. Because the tape recorder didn't have any way for me to record the exact point in time I was at on the tape, I made a few allowances. This meant I couldn't exactly match up my two-minute shift in the light data with the two-minute shift in sound data second by second. I had to try and play the tape back and take sound readings at roughly equal intervals. Due to the fact that I couldn't exactly match up the time from sound and light, I decided I could measure them independently. This allowed me get rid of the cumbersome book setup for the light readings if I just needed new data for the sound. I could now fix the three problems I had run into doing my most recent experiment. The first being the books. I didn't have to set the cylinder on them; therefore they no longer absorbed any of the sound. Secondly I could now tap the cylinder on the bottom. This was due to the fact that the light and books didn't get in the way of my hand movements anymore; they were no longer part of my setup. The third factor was easily solved. I recorded my data and played it back into the microphone at a point in time when there was no one else in the physics laboratory.
My new data was refreshingly on track when compared with my previous failed attempts. I analyzed it in the same fashion as before. Slowly breaking down the 0.2 seconds of data into something I could examine. The one big difference this time was I examined a larger chunk of the 0.2 seconds in the hopes of finding more reliable data. Rather than look at a 0.02 second chunk I looked at and counted the periods of a 0.05 second chunk of data. I was running on the assumption that the more data analyzed the more reliable the findings. I couldn't have gone much larger than a 0.05 second set of data though. This was due to the fact that at a higher quantity of data, there was such a high amount of periods that I couldn't discern one from another when trying to count them. I also upped the amount of recorded points that I analyzed from 25 to 31. When I calculated the frequencies and speed of sound of my final experiment they were an improvement in several ways. First was the fact that the data from both the sound and light matched up. And secondly this time no data points where outside the realm of reality. Every recorded speed of sound stayed safely between the speed of sound in air (333 m/s) and the speed of sound in water (1440 m/s). There was no recorded speed of sound that went into the 3000 m/s range like in my first experiment.
Final
Analysis:
In this section I intend to further compare the speed of sound data from
both experiments with that of the light as well as discuss further failings
of my experiment and their solutions. Just to make sure my analysis of
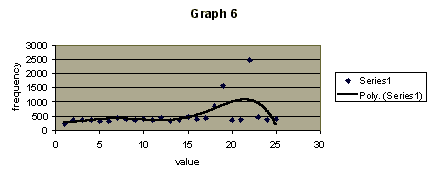
the data was correct, I plotted a line of best fit for my speed of sound
scatter-plot graphs using Microsoft Excel. Each line is polynomial function
of the 6th degree. By comparing my final experiment on the sound with
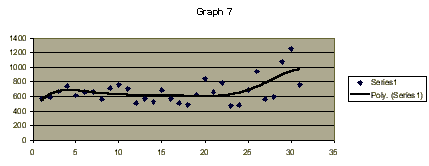
my data about the light I found that my hypothesis was proved correct.
That as the bubbles decrease (i.e. light increases) the speed of sound
through the water does in fact increase in speed. (see graphs 5-7: where
graph 5 is the light, graph 6 is the first sound experiment and graph
7 is the final sound experiment).

Well I proved my hypothesis, but there are still several factors I could
consider for the further improvement of this Lab. Some of these factors,
although I may bring them to light, I don't necessarily know how to solve
them. One of them is the effect the glass has on the speed of sound readings.
What kind of tone difference did it add to the overall pitch of the water?
Was it enough to throw off any data readings I may have taken? I believe
so, but not to the point that it makes my data invalid. I think the glass
acted much like the textbooks. It absorbed or changed the sound emitted.
The reason the experiment still worked is that unlike when the books were
in place, the change in pitch could still be heard through the glass.
Also, the glass's density and pressure did not change throughout the experiment,
so any effect it would have had on the pitch would have been constant
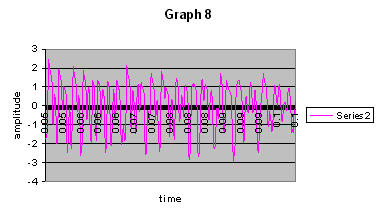
and unchanging. Another possible area for error was my calculation of
the periods. On some graphs it was next to impossible for me to discern
where one period started and another stopped (see graph 8).
At times it could be quite easy to miss read a period. Questions like
"does that slight dip constitute a new period, or is it part of the last
period but possibly an overtone or some other occurrence," constantly
racked my brain? Misinterpretation of the periods could cause quite a
difference in the data I collected. Also I didn't have the tools to determine
the percentage of a period that was within a given time frame. I had to
round to the nearest whole period. Luckily the time readings were extremely
accurate so they helped make up for some inaccuracy in the analysis of
the periods. The final problem is the use of the tape recorder, and in
using it the possible inaccurate readings of the sound plus the inability
to match up exactly when a given sound was made with an exact reading
of light at that corresponding point in time. Besides these factors and
others I am sure I have not found, I find the process in which I conducted
my experiment was quite feasible and conducive of what can be done in
a class-room setting.
Now you may be wondering…didn't he talk about bulk modulus in the introduction?
And why didn't he use it in his calculations? Well for one, it would have
been great to use, but it's not something I have the ability to discern.
With the equipment available I couldn't measure the constantly changing
density, p, of the substance. And measuring density would have been the
easy part. To find the bulk modulus I would have had to keep my air bubble/water
substance under constant pressure and strain, which would change as the
air dissolved. Not only would that be difficult in of itself, I would
have needed to take measurements while all that was going on. In a high
school laboratory I don't see that as very feasible. So instead, using
the formula ( v = f * lambda) I found the frequency and wavelength in
order to arrive at the speed of sound.