THE RIVER WILD
A web page created by Jessica Ballantyne and Casey Martin
TABLE OF CONTENTS
Background Information
Hypothesis
Method
Results
Discussion
Links
Background Information to top
Each year, hundreds of thousands of gallons of water falls upon the earth. But where does all of this water go? Much of it soaks into the earth’s soils, a lot of it evaporates into the air, and the remaining water runs into the earth’s streams and rivers. The earth’s geography changes over time due to these great rivers cutting paths through various places (Clark).
Just like all other rivers, the Tualatin River has transformed the land over the years. Ice-age elephants, camels and giant beaver once roamed the banks of the Tualatin River, however, today, things are very different (The Watershed). The Tualatin River now cuts through densely populated areas. The Twality Indians no longer use it for fishing, but, rather, it is used for drinking water and, ironically, sanitation dumping (Riverkeepers). Not only has the Tualatin River affected the people and geography around it, but the population has affected it as well. A hundred years of misused natural resources has left the river slower than its ideal pace. Which leads us to our final question: How fast is the Tualatin River moving, or, rather, how many cubic meters of water flows past a certain point in the Tualatin River in one hour?
Hypothesis to top
In order to answer our question and formulate a hypothesis, we must discover a few things. First, we must discover the true velocity of the river, which we believe will be approximately 1600 meters per hour (1600 meters is approximately 1 mile). Secondly, we must determine the area of water in a set place on the river. We believe that this area will be approximately 70 square meters. With these estimations, we hypothesize that the number of cubic meters that flows past a certain point in the Tualatin River in one hour is approximately 112,000 cubic meters.
Method to top
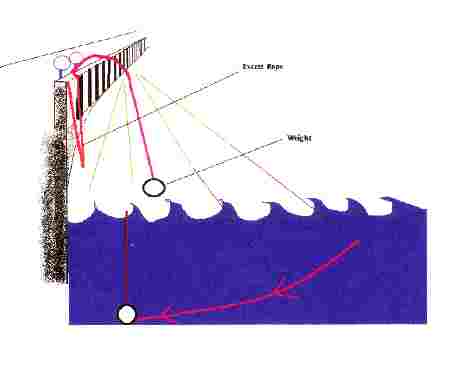
One cold winter morning the two of us set out on an adventure that would teach us a thing or two about our procedure and the necessary things we would need if we were really going to discover the depth of the mighty Tualatin River. We set out with our 50-foot bright yellow nylon rope and our 8.8 pound bar bell weight. Unfortunately, we chose a bad morning for our experiment—the grounds were icy and the air was very cold. However, we decided to go ahead with our testing. We chose the bridge near the Tualatin public library, a very educational location if you must. This bridge spans 154 feet across and there are sidewalks on both sides. We chose our first spot for measurement that was located 15 feet from the right hand side bank of the river. We slowly lowered the weight, which was securely tied to the rope, until the bottom of the weight was skimming the surface of the water. We then used a small piece of tape on the rope to mark this occasion. The rope was then slowly lowered down into the river until the rope began to gain slack, it was then pulled back up again until taut—this told us the weight was resting on the bottom of the river. A second piece of tape was placed on the rope to mark this occasion and was labeled with a #1. However, it was essential that we take into account that our rope was not directly below us when our rope was pulled taut. Instead, the current had pulled the rope slightly to the right bank at an angle of approximately 10 degrees. After pulling the rope back onto the bridge, we measured 10 feet to our left repeated the procedure. However, after marking the second point on the rope with a piece of tape and a #2, we discovered that we were, unfortunately, at the end of our rope! I guess that 50 feet just wasn’t going to cut it. As this event rolled around, we discovered we could no longer feel our hands and decided that the best way to solve this first major dilemma was over a good breakfast.
After purchasing the 100-foot bright yellow nylon rope, we set out for day number two of our experiment. We again repeated our depth measurement procedure for points one and two in case the river levels had changed from our first extravaganza. We continued across the river, measuring and recording a depth for every 10 feet across the bridge. However, an interesting thing occurred as we neared the middle of the river. The current became stronger and began to pull the rope under the bridge so that it was nearly impossible to measure the angle. We saw that by lowering the rope slowly, we were allowing the current to pull the weight under the bridge; therefore, we decided to try something new. Casey, with his large, rippling biceps, began to swing the rope and, hence, the weight before lowering it into the water, as seen in the diagram below. This would allow the weight more room to sink to the bottom before going under the bridge. However, this failed because the rope was not being released fast enough for the weight to hit the bottom before the current took a great effect. Therefore, in our next attempt, we placed more rope over the edge so that the weight would have lots of slack. This fortunately worked! The weight would sink to the bottom before going under the bridge, however, it took a bunch of excess rope with it. We had to pull rope back up over the railing until the rope was taut—and it even vibrated!
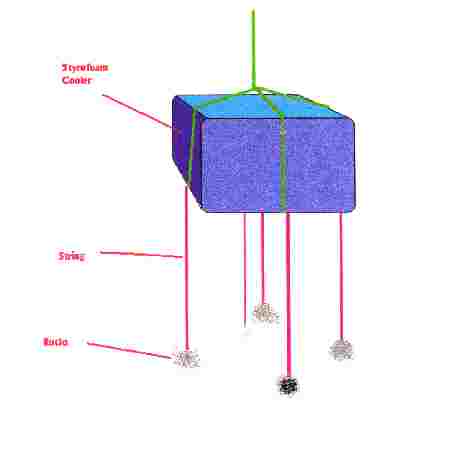
On a different, yet colder day, we began our search for the velocity of the current. We had to come up with a floating device that caught not only the surface, but the undercurrents as well. To solve this problem we came up with an ingenious, but cheap, device. This device, as seen below, consisted of a Styrofoam cooler, string, duct tape, and rocks. The rocks did not only serve as weight, but also to catch the current beneath the water’s surface. Hoping to prevent major wind interference, weight was needed to hold down the Styrofoam.
To measure the velocity, Jessica jaywalked across the street to the other side of the bridge. Casey then began to lower the cooler by a long, thin spool of string, providing excess slack so that the cooler would not be slowed down when it was released. He then raised his arm, dropping it when he let the cooler float downstream—this was the signal for Jessica to begin the stopwatch. She then leaned over the bridge and when the cooler appeared, she stopped the stopwatch and recorded the time. Casey then reeled the cooler back in and we repeated the procedure three other times. Now that the times were recorded, it was necessary to measure the distance that the cooler had traveled. This was, of course, the width of the bridge. Now, because this bridge is heavily trafficked, it made this part of the experiment a bit tricky. We decided to pull a string from one side of the bridge to the other, cut it, and reel it back in between heavy fluxes of cars. To picture this, imagine that long cherished game "Frogger". Fortunately, Casey’s swift agility carried him across the busy road without a scratch. Knowing both the time and distance, we are able to calculate the velocity of the cooler, and therefore, the velocity of the water.
Results to top
Using the data we collected from measuring the depth points, we were able to
derive a few important things. As seen in the chart below, the depths we
measured and the actual depth of the river are not the same thing. To find the
actual depth, we must take into account the angles measured. Using the formula
cos ?= adjacent/hypotenuse. Calculations are presented in the table below.
|
Distance from Right Bank |
Measured Depth in feet |
Predicted Angle |
Actual Depth in Feet |
Actual Depth in Meters |
|
15 feet |
11 feet, 10 inches |
10 degrees |
11.65 feet |
3.55 |
|
25 feet |
19 feet, 4 inches |
15 degrees |
18.67 feet |
5.69 |
|
35 feet |
22 feet, 8 inches |
10 degrees |
22.666 feet |
6.91 |
|
45 feet |
25 feet, 0 inches |
15 degrees |
24.148 feet |
7.36 |
|
55 feet |
26 feet, 7 inches |
15 degrees |
25.667 feet |
7.83 |
|
65 feet |
20 feet, 11 inches |
5 degrees |
20.837 feet |
6.35 |
|
75 feet |
19 feet, 0 inches |
10 degrees |
18.7 feet |
5.7 |
|
85 feet |
16 feet, 7 inches |
5 degrees |
16.583 feet |
5.06 |
|
95 feet |
18 feet, 0 inches |
10 degrees |
16.52 feet |
5.04 |
|
105 feet |
16 feet, 6 inches |
15 degrees |
15.94 feet |
4.86 |
|
115 feet |
15 feet, 7 inches |
0 degrees |
15.583 feet |
4.75 |
|
125 feet |
11feet, 9 inches |
3 degrees |
11.734 feet |
3.58 |
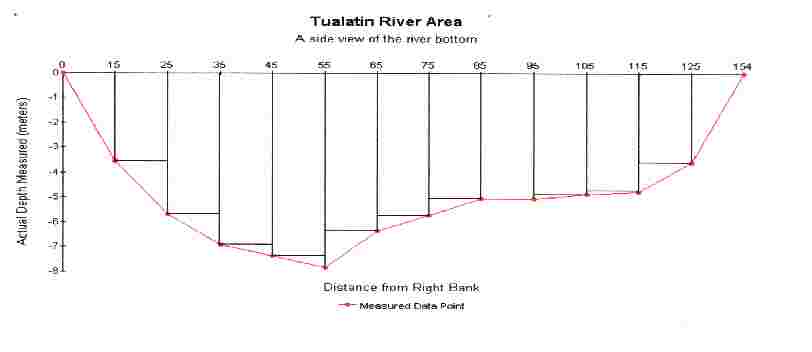
Knowing this data, it is now possible to create a graph of the river bottom, using "distance from right bank" on the x-axis and "actual depth in meters" on the y-axis.
Now that we have established the contour of the river bottom, we can find
the area! To do this, it is easiest to use geometric shapes that have easily
found areas—like rectangles and triangles. Both of these shapes can be found
within the graph’s area, and it is simply a matter of cutting the graph into
segments and calculating the areas. This is done on the graph seen on the next
page.
It is easy to find the areas of each segment by using the formulas A=XY for
the squares and A=1/2XY for the triangles. After finding the segment areas,
they are added together to find the total area of the river point. We
calculated this area to be 210.597 square meters. However, there is a great
amount of uncertainty in all of our calculations due to various reasons. One
major uncertainty would be the angle accuracy. While all of our angles were
measured to the nearest 5?, it still may have affected the actual depth in the
long run. A second uncertainty is knowing when the weight actually hit the
river bottom. Because of heavy pollution, it is impossible to see to the bottom
of the Tualatin River, and, therefore, there is no way to tell except for our
"feel" that the weight has hit the river bottom. Taking into account
our uncertainties, the angle could be +-5?, and the depth could be +-1 foot.
The second part of the experiment was measuring the velocity of the river. Our four times recorded are: 14.24 seconds, 13.75 seconds, 14.48 seconds, and 14.66 seconds. By averaging the four points, we come up with a conclusive time of 14.28 seconds! Using this time, and the measured distance of 14.86 meters, we calculate a velocity of 1.04 meters per second! There are also various uncertainties that may have affected this velocity such as human error and amount of current measured. Human error includes reaction time during timing the cooler under the bridge—our hands were freezing and they were definitely slowing down. We may not have put enough weight on the cooler to measure currents beneath the surface of the water. The uncertainty of time can be predicted by the range—approximately +-.5 seconds. However, the uncertainty with the cooler can only be predicted with further experimentation, using a variety of weights and flotation devices.
Now comes the grand finale where we answer that nagging question of how many
cubic meters of water flows past that certain point in the Tualatin River in
one hour. To determine the number of meters that flow past the point, we can
use our calculated velocity: (1.04 meters/second )(3600 seconds/hour)= 3744
meters/hour. Now, we multiply this dimension by our area (210.597 square
meters) to find the real answer…788,475.168 cubic meters!
Discussion to top
Considering we have never tried to swim to the bottom of the Tualatin River before, and never will, our hypothesis was fairly close to our final answer, a mere 676,000 cubic meters off. Now we appreciate the full, ruthless power of the Tualatin River. We can not be sure if we are correct or even close to being correct on this measurement, but there are steps that could be taken to improve the procedure. For instance, we could take more data points along the bottom of the river and also use some sort of light to see that the weight has hit the bottom. While the experiment can be improved upon, there are also many new and exciting directions it can be taken in. Not many of them are directly related to physics, but, then again, either is river flow. It would be interesting to see if there is a correlation between rain fall and river flow—how much does the river rise after a rain storm and how long does it take before there is a recordable difference? Another idea is to see how the small tributary by our river point affects the flow. How much water is lost to this tributary? How does it affect the river bottom? It would also be exciting to measure another point upstream and downstream of the original point and compare the three. How does velocity change? Is there a dramatic change in area and does there seem to be a reason for this? It is evident that there are many questions that remain unanswered that future IB Physics 2 students will be excited to explore.
Links to top
http://oregon.usgs.gov/tualatin/streamflow
This
site contains information on the streamflow and other interesting aspects of
the Tualatin River. Other
links can also be found on this page.
http://www.trwc.org/watershed.html Scroll through this site and learn about the history of the Tualatin River!!!
http://www.tualatinriverkeepers.org/ Learn how you can join the tualatin river keepers organization--they keep track of almost everything that river is doing...from the animals to the bulk flow!
http://www.river-flow.com/ Find all
the beginning topics and ideas of riverflow and find out how to spell gage
http://www.atmosphere.be/web/mykrib/ Find out about velocity and neato
pictures
http://smig.usgs.gov/SMIG/features_0398/ammonia_tual.html what’s in that river?