Calculating the Drag Coefficient of a Parachute on a Model Projectile Propelled by a Chemical Reaction (but not a bullet)
Alex Brown
Concept 0: What comes up, must come down.
Concept 1: If an object creates a force opposing gravity on its descent, the object will fall slower due to the force of drag.
In Webster’s dictionary, drag is defined as 1. Something used for pulling along 2. Something without wheels 3. Something that slows down motion and 4. A dull or unpleasant person, place or thing[1]. In Astronautics, drag is everything but definition 4; It’s a must for any aerodynamic aircraft to have the ability to create drag in order to slow it down, the most common form being parachutes during descent. Don’t believe it? Consider the Genesis spacecraft in 2001, that crash landed due to a faulty parachute system, losing hundreds of solar wind samples. Or maybe Apollo 15 comes to mind, where only 2 out of the 3 opened successfully (the spacecraft was built to allow 2 out of the 3 parachutes be enough to land in the ocean safely). It seems imperative to understand how drag can be used effectively in order to make a safe landing without making room for space or needing a bigger budget.
So, how exactly does drag work? Consider the expression D=1/2*P*V^2*S*Cd. Everything has air resistance, and as the velocity of an object increases, the amount of drag increase, making acceleration decrease. Eventually, the object will cease to accelerate; it will reach terminal velocity. Objects with more air resistance will have a lower terminal velocity, thus descending slower. The easiest way to manipulate drag is by either changing the material of the object (affecting the drag coefficient), or changing the surface area, which is what I intended to do with this experiment.
[Top] Statement: The purpose of this experiment is to study how the surface area of a parachute affects the terminal velocity of a falling projectile.
[Top] Hypothesis: If I increase the surface area of the parachute, there will be more force acting upon the parachute, increasing the air resistance of the projectile and finally slowing the descent. Thus, the surface area of the parachute is our independent variable, and the terminal velocity the dependent variable. If we measure the mass of the rocket, calculate it’s altitude and the time of its descent, we can calculate the terminal velocity of the parachute and the overall upward force it exerts. The control variable will be the projectile’s mass, the falling distance, the drag coefficient of the parachute, and for the most part the air density.
"Aerocon Systems Parachute Drag Calculation." Aerocon Systems. Aerocon, n.d. Web. 20 Dec. 2013.
Drag. Webster's Dictionary for Students. New York: Sandy Creek, 2010. 132. Print.
Dunbar, Brian. "Apollo 15." NASA. NASA, 19 Sept. 2013. Web. Winter 2013.
Elert, Glenn. "Aerodynamic Drag." The Physics Hypertextbook. Glenn Elert, 17 Dec. 2013. Web. 20 Dec. 2013.
Mitchell, Brian. "Genesis." Genesis. NASA, n.d. Web. 20 Dec. 2013.
1 model rocket (AGM-57X Heatseeker)[Glue, scissors and modeling knife required for assembly]
3 B4-4 engines
1 interior altimeter
3 parachutes (12 inch, 18 inch, and 24 inch)
1 scale
1+ stopwatch(s)
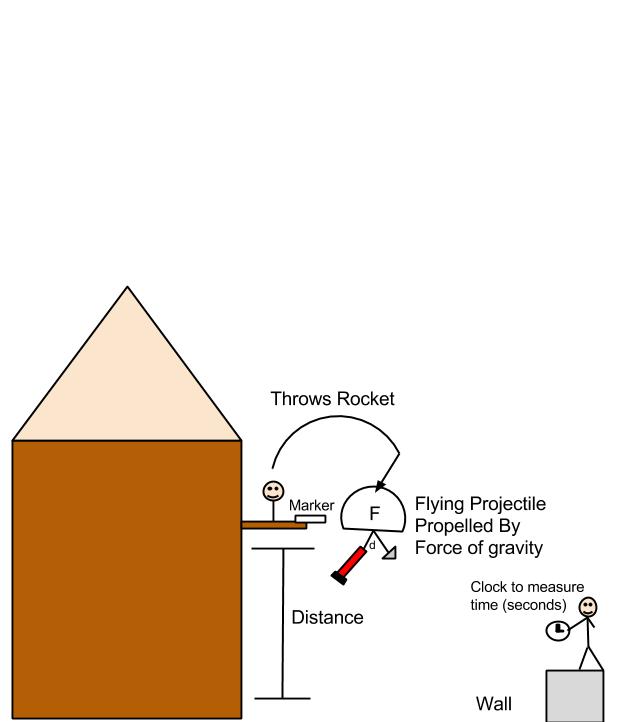
Weigh projectile. Record results. Environment should be set up in such a way that a) the rocket can be dropped at a high altitude b) there is room to throw the rocket higher than the marked altitude and c) a flat, soft and open surface for the projectile to land on. Mark the height you wish to begin timing and measure that length to ground level (make sure the mark is below the person throwing the projectile). With the projectile at the high area, Tie 1 of the parachutes (I went shortest first) to the projectile and keep the projectile open in such a way that the head and the tail are split with the parachute facing half-circle up. Another person should be at ground level with a stopwatch to time the projectile when it descends. With everything set up, have the person with the projectile throw the projectile in such a way that the parachute will slow its descent down to terminal velocity. Assuming the projectile reaches its terminal velocity, the person at ground level will start the timer when the tail-end of the projectile touches the marked area, and stop when it reaches the ground level. Record the time and send the projectile back to the top area by whatever practical means. Rinse and repeat for 15 trials, then switch to another parachute. After all 15 trials for the 3 parachutes have been recorded, results can be analyzed. Next, equip the altimeter inside the rocket and set up the rocket in such a way that you can actually launch the projectile, time its descent from the point the parachute breaks out until it reaches ground level, and calculate the altitude with the interior altimeter in the projectile to compare the results of an actual flight with the results of a controlled one.
RAW DATA | ||||||||||
Parachute Trial | Length Orange | Length Blue | Length Red | Orange Time | Blue Time | Red Time | Mass | Gravity | Distance | Air density at 0 degrees |
1 | 0.305 | 0.46 | 0.61 | 1.02 | 1.34 | 2.75 | 0.056699 | 9.81 | 3.8862 | 1.3 |
2 | 0.305 | 0.46 | 0.61 | 0.9 | 1.78 | 2.13 | 0.056699 | 9.81 | 3.8862 | 1.3 |
3 | 0.305 | 0.46 | 0.61 | 0.92 | 1.6 | 2.21 | 0.056699 | 9.81 | 3.8862 | 1.3 |
4 | 0.305 | 0.46 | 0.61 | 0.92 | 1.75 | 3.12 | 0.056699 | 9.81 | 3.8862 | 1.3 |
5 | 0.305 | 0.46 | 0.61 | 0.84 | 1.66 | 2.15 | 0.056699 | 9.81 | 3.8862 | 1.3 |
6 | 0.305 | 0.46 | 0.61 | 0.99 | 1.77 | 2.31 | 0.056699 | 9.81 | 3.8862 | 1.3 |
7 | 0.305 | 0.46 | 0.61 | 1.04 | 1.47 | 2.06 | 0.056699 | 9.81 | 3.8862 | 1.3 |
8 | 0.305 | 0.46 | 0.61 | 1.08 | 1.34 | 2.09 | 0.056699 | 9.81 | 3.8862 | 1.3 |
9 | 0.305 | 0.46 | 0.61 | 1.01 | 1.82 | 2.38 | 0.056699 | 9.81 | 3.8862 | 1.3 |
10 | 0.305 | 0.46 | 0.61 | 1.21 | 1.78 | 1.85 | 0.056699 | 9.81 | 3.8862 | 1.3 |
11 | 0.305 | 0.46 | 0.61 | 1.1 | 1.62 | 2.91 | 0.056699 | 9.81 | 3.8862 | 1.3 |
12 | 0.305 | 0.46 | 0.61 | 1.03 | 1.53 | 2.03 | 0.056699 | 9.81 | 3.8862 | 1.3 |
13 | 0.305 | 0.46 | 0.61 | 1.06 | 1.92 | 2.32 | 0.056699 | 9.81 | 3.8862 | 1.3 |
14 | 0.305 | 0.46 | 0.61 | 0.94 | 1.87 | 2.36 | 0.056699 | 9.81 | 3.8862 | 1.3 |
15 | 0.305 | 0.46 | 0.61 | 0.97 | 1.31 | 2.41 | 0.056699 | 9.81 | 3.8862 | 1.3 |
Average | 0.305 | 0.46 | 0.61 | 1.002 | 1.63733333333333 | 2.33866666666667 | 0.056699 | 9.81 | 3.8862 | 1.3 |
Terminal Velocity Theoretical | |||
Small | Medium | Large | |
Parachute Size (Inches) *Actual measurement* | 12 | 18 | 24 |
Mass (Kg +/- .008) | 0.0567 | 0.0567 | 0.0567 |
Parachute Area (m^2)) *Actual measurement* | 0.0729 | 0.1641 | 0.2917 |
Gravity (m/s^2) | 9.81 | 9.81 | 9.81 |
Air Density (Kg/M^3) *At 0 degrees C* | 1.3 | 1.3 | 1.3 |
Terminal Velocity (m/s) | 3.43 | 2.28 | 1.71 |
Time to fall 3.88m +/- .001 (seconds +/- .2) | 1.1 | 1.7 | 2.3 |
Terminal Velocity Test Data | |||
Average time +/- .2 | 1.00 | 1.63 | 2.33 |
Terminal Velocity (m/s) | 3.88 | 2.38 | 1.67 |
Terminal Velocity Fly Test | |||
Mass (Kg +/- .008)(rocket + engine + altimeter) | 0.092 | ||
Gravity (m/s^2) | 9.81 | ||
Air Density (Kg/M^3) | 1.3 | ||
Terminal Velocity (m/s) | 4.367 | ||
Calculated Terminal Velocity (ft/s) | 14.33 | ||
Altitude from Altimeter (meters +/- 1) | 83.5 | ||
Measured Freefall time (seconds +/-2) | 13 | ||
Measured Terminal Velocity (m/s +/- 2) | 6.4 |
The time it took for the projectile to land took longer when the surface area of the parachute was greater. In turn, the terminal velocity was lowered as well. Most of the data averages I collected was well in range of expected results, except for the actual test flight (in green highlight).
In conclusion, I found that the surface area will decrease the terminal velocity of the flying projectile, proving my hypothesis correct. Even though the parachutes were made of the same material, the surface area allowed more force to act upon the parachute. Unfortunately, I have also come to the conclusion that bigger isn’t always better.
Throughout the experiment, it became more clear how much more susceptible bigger parachutes are to directional influence. With the smallest parachute, most force on the object was still downward, and didn’t seem as vulnerable to wind changes than the other two. The medium and large parachutes would go much farther out of place than it’s initial drop zone. This could explain why the range of my data increases when the surface area increases:
Parachute size | Biggest time | Smallest time | Range |
12’’ | 1.21 | .84 | .37 |
18’’ | 1.92 | 1.31 | .61 |
24’’ | 3.12 | 1.85 | 1.27 |
It seems like I violated the law: Newton’s first, to be exact. With a smaller parachute, the upward force is a lot more central to the base of the rocket and has a lot less force exerted. With a larger surface area, you have more upward force, yes, but not all of it is as centralized as it was before; it may swing to the sides a bit instead of directly up. This was an unforeseen consequence for me, and would be interesting to come back to if I were to do this again.
The main source of error in this experiment comes from the actual rocket launch itself, and this comes to no surprise. We had limited trials of an actual launch, and due to technological issues with the altimeter, I only received one -yes, ONE- trial with corresponding time and altitude. This trial also started the timer the second the parachute went up; This means it still had a while before it reached its terminal velocity, and that the altitude recorded by the altimeter is much higher than the precise altitude it reached terminal velocity. Not to mention that we didn’t add the altimeter and the engine into the rocket launcher when doing the controlled tests. This explains why the velocity of the controlled test is much lower than the actual test.
If I were to make improvements, I would certainly want at least two people instead of one recording the time. If that one person screws up, they either record an outlier or redo the trial. with two, not only could I replace a poor time with a more precise time, I could find the average of the two times to get a more balanced result. It would have been very nice to do it inside where there would be very little wind interference and as a result a lower range for my data, especially for the larger parachutes. All these would make the calculated velocity much more accurate and precise.
www.aeroconsystems.com/chutes/drag_calculator.htm- A useful website that derived the drag equation I used
http://science.nasa.gov/missions/genesis/- Context on the importance of parachutes in actual NASA missions
http://auto.howstuffworks.com/fuel-efficiency/fuel-economy/aerodynamics.htm- basic overview on aerodynamics
www.grc.nasa.gov/WWW/k-12/airplane/drag1.html- basic overview on drag
http://www.pcprg.com/student.htm -Gave me ideas to test drag and create the experiment in the first place