water droplets and surface tension
Background / Procedure / Conclusion / Set-up Photos / Photo Results / More Photos / Helpful Links
IB Physics Project
By: Haneen A., Alex Grace T., & Paul H.
(top) Materials, Set Up and background:
· Plastic Tub (fill with water to the rim)
· Food coloring
· Strobe light
· Dark sheets
· Camera and tripod
· Ladder
· Tape
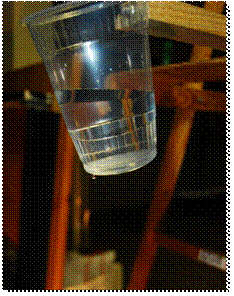
· Plastic cup with a whole made at the bottom using a needle
· Dark sheets
· In the primary trials, we used a sharpie and a turkey baster
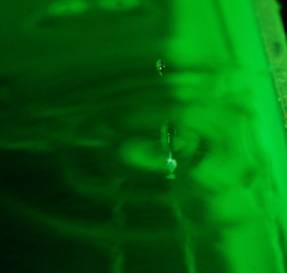
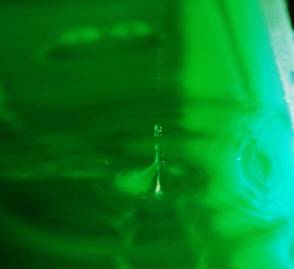
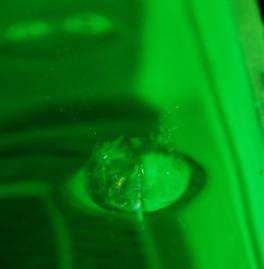
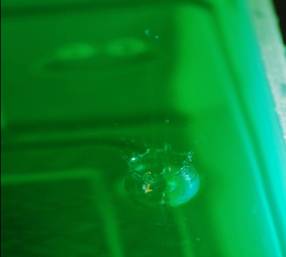
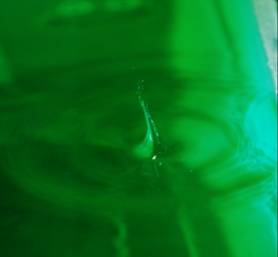
There are four basic steps to a water droplet as it collides with the surface of the water. The first step is called the "Crown", here the droplet hits the surface of the water, breaking the tension and creating a ring-shaped splash around a crater. The second stage, called the "Column" implies that the surface tension acts like a spring which forces the water to rise from the center of the crater, creating a column. In the third stage, “Propel", the top of the column continues to rise, turning into a droplet as the rest of it falls away. Finally, "Collapse", acts as the fourth stage in which the projected droplet collapses and creates ripples. The objective of this investigation is to make portraits of water droplets colliding with the surface of the water. Our inspiration that lead this exploration was Martin Waugh. He designs and sculpts water droplets; there are many pictures and videos on his website: liquidsculpture.com. He was also featured on Discovery Channel’s “Time Wrapped”.
(top) Procedure:
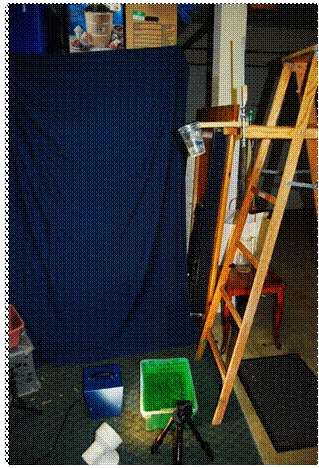
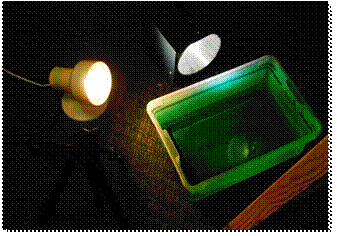
Our investigation first started in a garage. We taped the dark sheet to the garage door to make the room darker in order to maximize the quality of the pictures we were about to take. We filled a plastic tub with water to the very top and placed it in front of the dark sheets. Next, the strobe light was connected to face the dark sheets. Then we setup the camera on the tripod and marked a specific zone on the edges of the tub so that when we manually released the water droplets we could estimate the general area of its contact with the water surface. We conducted numerous trials using this method. We added food coloring to the water which made the pictures more clear, since the green color we used captured better quality picture. But later, using a parent’s help, we setup a concrete base that released water droplets by attaching a plastic cup (that we poked with a needle) to a ladder that was placed over the plastic tub. This way, once we put water into the cup, water droplets were released at a constant speed. Additionally, this way the droplets fell in a more precise and continuous area in the tub which helped us generate more and better portraits of the droplets’ collision.
(top) Conclusion:
We were able to successfully carry out our objective. The pictures we generated were high quality and we were able to capture photos of all four stages of a droplets collision with the water’s surface. While investigating this issue, we learned that manually carrying out the release of droplets led to lots of error.
(top) Set-Up Photos
Complete Set-up, droplet apparatus, and colored water with lighting.
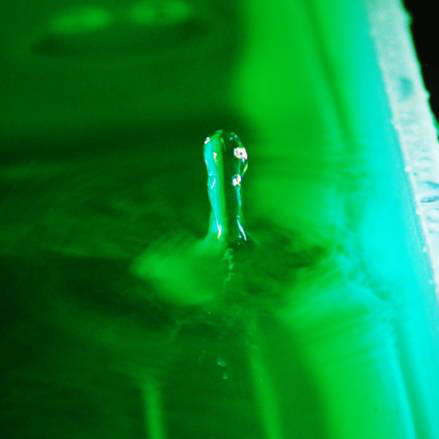
(top) Resulting Photos
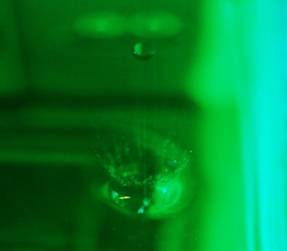

Stage One: "Crown"- the droplet Stage Two: "Column" - the surface tension forces hits the surface of the water the water to rise
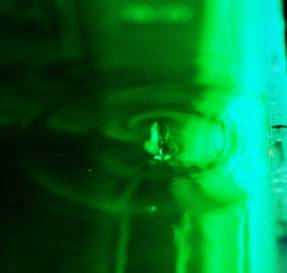
Stage Three: "Propel" - the top of the Stage Four: "Collapse" – the projected droplet
column continues to rise, turning into collapses and creates ripples
a droplet, rest of it falls away
(top) More Photos
(top) Helpful Links
www.branta.connectfree.co.uk/surface_tension - A helpful page describing surface tension in liquids. It goes into detail about the atomic forces between particles.
www.liquidsculpture.com - Liquid Sculpture, as we referenced earlier, originally inspired us to look into the science of water droplets. The photos are beautiful and the website is easy to navigate.
dsc.discovery.com/tv/time-warp/time-warp.html - This discovery Channel TV series dives deep into the world of high-speed photography. Each episode presents a unique opportunity to view everyday events in slow motion. The website and series are very interesting and thought provoking.
physicsworld.com/cws/article/print/168 - An in-depth analysis on the applications of the physics of water droplets. This article is very wordy but offers insight into the world of surface tension.
www.slrphotographyguide.com/macro/waterdrop.shtml - An easy guide on creating macro water-droplet photos at home.